Creating unique accents for your living space can transform the overall ambiance, adding both functionality and charm. The art of constructing supportive features not only enhances safety but also allows for customization that reflects personal style. In this section, we will explore the essentials of design and craftsmanship involved in making these essential elements a reality.
Embarking on this creative journey requires a blend of imagination and practical skills. By utilizing various materials and techniques, one can achieve stunning results that elevate the aesthetic of any area. Whether you’re a seasoned artisan or a beginner, there are plenty of options to express your creativity while enhancing your living environment.
As you delve into this rewarding endeavor, consider the benefits of incorporating natural resources that bring warmth and character. Thoughtful planning and execution will not only result in beautiful additions but also instill a sense of accomplishment. Join us as we uncover the step-by-step process of bringing your vision to life, ensuring both reliability and elegance in every piece you create.
Choosing the Right Materials for Handrails
Making informed decisions about resources is essential when crafting a railing system for your living space. The variety of options available can significantly influence both the aesthetic and functional qualities of the finished item. Evaluating various factors such as durability, maintenance demands, and visual appeal will guide you to the best choices that suit your individual needs.
Types of Materials
Natural timber is commonly favored for its classic look and warm, inviting feel. It can be customized easily through staining or painting to match existing elements in your home. Metal options, such as aluminum or wrought iron, offer a modern touch and exceptional resilience against wear and tear. Composite materials are also gaining popularity due to their low maintenance requirements and resistance to decay.
Durability and Maintenance
Consider the longevity of the selected materials, especially in high-traffic areas. Quality pieces can withstand daily use while maintaining their structural integrity. Additionally, ease of upkeep should influence your selection process; some materials may necessitate regular treatment or refinishing, whereas others might simply require periodic cleaning.
Essential Tools for Your Woodworking Project
Creating functional and aesthetic pieces requires a range of equipment to ensure precision and efficiency. The right set of instruments contributes not only to the quality of the final product but also to the overall experience of crafting. Familiarity with various tools will empower you to enhance your skills while achieving remarkable results.
Basic Hand Tools
Hand tools are fundamental for any woodworking endeavor. They offer versatility and can be used for various tasks. Below is a summary of essential hand tools:
|
Tool |
Purpose |
|---|---|
|
Chisels |
Shaping and detailing wood |
|
Saws |
Cuts through wood pieces |
|
Mallet |
Driving chisels and other tools |
|
Squares |
Ensuring accurate corners and angles |
Power Tools
Power tools greatly enhance productivity and allow for more intricate designs. These instruments can save time and improve precision when compared to manual methods. Below is a list of important power tools:
|
Tool |
Purpose |
|---|---|
|
Power Drill |
Drilling holes and driving screws |
|
Router |
Carving edges and creating joints |
|
Sander |
Smoothing surfaces and edges |
|
Table Saw |
Making straight and accurate cuts |
Design Ideas for Unique Handrail Styles
Creating distinctive railings can transform the ambiance of any space. The right combination of materials, shapes, and finishes can lead to captivating designs that enhance both functionality and aesthetics. Exploring various ideas can inspire an imaginative approach to your railing needs.
Materials to Consider
-
Metal accents add a modern touch.
-
Glass panels provide a sleek, contemporary look.
-
Natural fibers like rope offer a rustic feel.
-
Combining wood with alternative elements creates visual interest.
Shapes and Layouts
-
Sweeping curves to soften hard lines.
-
Geometric patterns for contemporary appeal.
-
Asymmetrical arrangements to draw attention.
-
Layered designs to add depth and character.
Experimenting with these ideas can yield personalized solutions that reflect individual style and enhance the overall décor.
Step-by-Step Guide to Building Handrails
This section provides a detailed process for creating sturdy and attractive support structures. Following these directions will help you achieve a solid result, enhancing safety and style in your space.
-
Gather Necessary Materials
-
Wooden boards (select appropriate types like oak or pine)
-
Wood screws
-
Wood glue
-
Sandpaper
-
Wood finish or paint
-
Measuring tape
-
Level
-
Saw (hand saw or power tool)
-
Drill
-
Safety goggles
-
Measure the Area
Use the measuring tape to determine the total length needed. Consider the height and spacing of posts if applicable. -
Cut the Wood
Follow your measurements and cut the boards to the required lengths. Smooth edges with sandpaper to avoid splinters. -
Assemble the Components
Arrange the pieces in place, ensuring proper alignment. Use wood glue for additional support where needed. -
Secure with Screws
Drill pilot holes to prevent splits and attach each piece with wood screws for stability. -
Finishing Touches
Once assembled, apply the chosen finish or paint. Allow it to dry fully before installation. -
Install the Structure
Position the completed structure where desired. Use a level to ensure it is even, then secure it in place with suitable fasteners.
Following these steps will enable you to create a reliable and visually appealing addition to your surroundings.
Finishing Techniques for Beautiful Wood Surfaces
Creating a stunning appearance on timber elements relies on effective finishing methods. These processes not only enhance aesthetic appeal but also contribute to durability and resistance against environmental factors. Properly executing these techniques can transform raw materials into captivating features in any space.
Sanding and Surface Preparation
Before applying any finish, meticulous surface preparation is crucial. Start with sanding to eliminate imperfections and achieve a smooth surface. Using varying grits allows for effective refinement, starting with coarser grades and progressing to finer ones. Ensure the surface is clean and dust-free before moving on to the finishing stage.
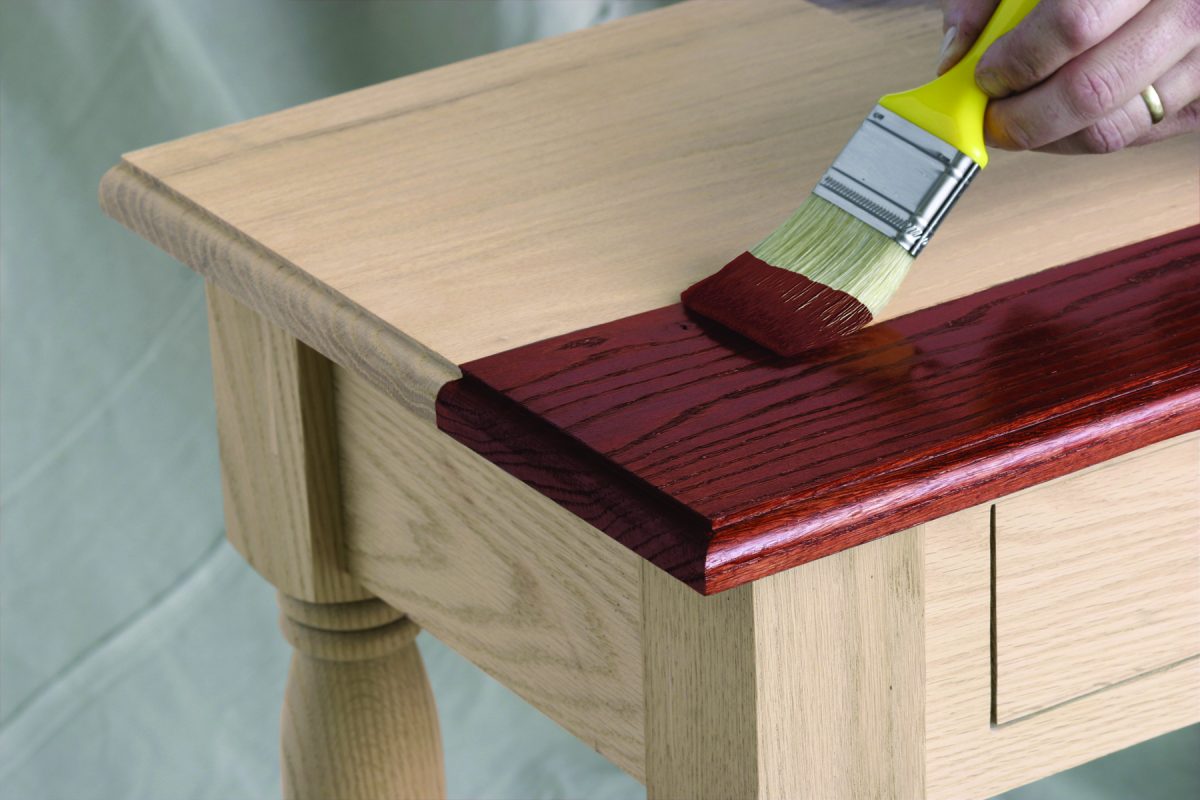
Applying Finishes
Several types of finishes can be employed to achieve desired effects. Oils provide deep penetration and enhance the natural grain, while varnishes offer a protective layer with varying gloss levels. Stains can add color and depth, allowing the characteristics of the timber to shine through. Always test on a scrap piece to ensure satisfaction with the chosen finish.
Installing Handrails: Tips for Secure Fit
Ensuring a sturdy and reliable structure is crucial when integrating railings into any space. Proper installation not only enhances safety but also contributes to the overall aesthetic of the area. Following best practices during assembly can help achieve this goal effectively.
-
Select the Right Materials:
-
Choose durable woods or composites that withstand everyday use.
-
Consider the weight and style, ensuring compatibility with existing decor.
-
Measure Accurately:
-
Take multiple measurements before cutting to avoid mistakes.
-
Account for any changes in elevation or angles in your area.
-
Secure Fastening:
-
Use appropriate hardware for attachment based on material type.
-
Ensure screws are tightly installed to prevent wobbling.
-
Check for Level:
-
Utilize a level tool during installation to maintain straightness.
-
Adjust as needed to ensure a uniform appearance across the structure.
-
Test Stability:
-
After securing, gently apply pressure to ensure there’s no movement.
-
Make any necessary adjustments for a more solid fit.
Following these guidelines will facilitate a safer and more visually pleasing integration. Regular inspections and maintenance can further extend the lifespan of the installation.
Q&A: Home furniture DIYing wood handrail
What tools do I need to build wooden handrails for my home projects?
To build wooden handrails, you will typically need the following tools: a miter saw or circular saw for cutting the wood, a drill for making pilot holes and driving screws, a measuring tape to ensure accurate dimensions, and a level to ensure that your handrails are straight. Additionally, sandpaper or a sander will help smooth out rough edges, while wood glue and clamps can provide extra stability. A safety gear, including goggles and a dust mask, is also recommended for protection during the project.
How do I choose the right type of wood for my handrails?
Choosing the right type of wood for your handrails depends on several factors, including durability, aesthetics, and budget. Hardwoods like oak, maple, or cherry are often preferred for their strength and beautiful finish, making them ideal for handrails that will be used frequently. Softwoods like pine or cedar can be more affordable and easier to work with, but may not be as durable. It’s also important to consider whether you want a stain or paint finish, as some woods take finishes better than others. Ultimately, select wood that complements your home’s decor and meets your functional needs.
Can I install wooden handrails without any prior woodworking experience?
Yes, you can install wooden handrails even if you have little to no prior woodworking experience! Many DIYers find success by following step-by-step instructions and using beginner-friendly designs. Start with simple shapes and straightforward installations, and take your time to measure accurately and cut carefully. There are plenty of online tutorials and videos that can guide you through the process. However, if you’re unsure about specific techniques or safety precautions, consider seeking advice from a more experienced DIYer or hiring a professional for complex installations.
What is the best way to finish wooden handrails after I’ve built them?
Finishing wooden handrails can enhance their appearance and protect them from wear and tear. Start by sanding the surface with fine-grit sandpaper to ensure it’s smooth. Next, choose between staining and sealing, or simply applying a clear coat. If you prefer a specific color, apply a wood stain and allow it to dry according to the manufacturer’s instructions. After staining, or if you choose not to stain, a polyurethane sealant can provide a protective layer against moisture and scratches. Be sure to follow the application instructions closely for the best results. Multiple coats may be necessary, so allow each coat to dry fully before applying the next.
What common mistakes should I avoid when making wooden handrails?
When making wooden handrails, several common mistakes can hinder the quality and safety of your project. First, failing to measure accurately can lead to ill-fitting pieces, so always double-check your measurements before cutting. Second, not accounting for the wood’s expansion and contraction over time can cause issues; leave some space for movement. Additionally, neglecting to use a level can result in uneven handrails, which can be unsafe. Finally, cutting corners on the finishing process may lead to unattractive results and reduced durability. Take the time to plan your project carefully, and don’t rush through any part of the process to avoid these pitfalls.
What are the key components involved in building a staircase?
Building a staircase involves several key components, including the treads, risers, and balusters. The tread is the horizontal part you step on, while the riser is the vertical component between each tread. You will also need stair railings, which can include a stair handrail and a newel post to provide support. Trim can be installed around the staircase to give it a finished look, and it’s important to adhere to local building codes during construction.
How can I renovate my porch railings to improve safety and aesthetics?
To renovate your porch railings, consider replacing the old balusters with new wood railings for a fresh look. Use solid wood for durability, and choose balusters that complement your home’s style. Installing a new handrail can enhance safety and accessibility. Be sure to use 4×4 posts to provide stability and check local building codes for height requirements. Sand the wood with 120 grit sandpaper for a smooth finish before applying a protective coating.
What is the best way to remove an old staircase railing?
The best way to remove an old staircase railing is to start by checking the newel post and balusters for any screws or nails. Use a finish nail puller to remove nails carefully. If the railing is secured with pocket holes, you may need to unscrew those as well. Once the railing is detached, fill any holes with wood filler to prepare for the new railing installation. Ensure you take care not to damage the surrounding drywall or trim during removal.
How do I ensure my newel post is installed correctly?
To ensure your newel post is installed correctly, start by securing it to the floor with lag screws or brackets for added stability. Check that the newel post is plumb, and use a level to confirm it is straight. If the post is attached to the staircase stringer, make sure it aligns with the nosing line for a professional appearance. Additionally, consult local building codes to ensure compliance with height and spacing requirements.
What are some design considerations for outdoor stair railings?
When designing outdoor stair railings, consider materials that can withstand weather elements, such as treated wood or metal. Ensure the balusters are spaced according to safety regulations, typically not more than 4 inches apart. Aesthetic choices, like using wood grain finishes or burls, can enhance the visual appeal. Additionally, think about the height of the handrail—generally around 38 inches is standard. Make sure the design complements the surrounding outdoor furniture and the overall look of the porch or patio area.